 In keeping with the theme of making the most out of what remains of the summer, I would like to share about how I was able to make memorable sunset portraits during a recent trip to Bantayan Island.
The key here is to use the setting sun as a rim light (also called backlight). A rim light essentially creates separation from the background by causing parts or all of the subject’s outline to glow (It has an especially dramatic effect on hair).
Just keep in mind that the sun won’t linger, so don’t waste too much time chimping*.
*A term used to describe the act of previewing images on the LCD screen almost after every capture, making chimp-like (Oooh! Aaah!) sounds while doing so. It’s not only going to drain your batteries quicker, but will cause you to miss shots as well.
__________
Making the Picture
If the technical details bore you, feel free to scroll down and view more of the photos.
With the sun acting as a rim light and creating an explosion of color in the sky, all that’s needed is to fill the subject’s face with flash. Without the fill, what you would probably get is a silhouette (again, nothing’s wrong with that as long as that’s what you were aiming for)
 I shot the photos with a 70-200 mm lens. My camera was set at an aperture of f/14 (to underexpose the sky a bit) and a shutter speed of 1/200 at ISO 200. I used a single flash on manual (at about 1/2 power) with a 1/4 CTO (Color Temperature Orange) gel shot through a Lumiquest Softbox III. The gel warms the light up and gives it an afternoon-sun quality to it, while the softbox softens it, which allows me to bring it in close to the subject’s face. The softbox is positioned on camera left, slightly above the subject’s face.
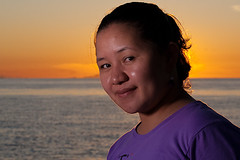
 And in the spirit of travelling light, I left my light stand in the bag (although I did bring it) and had a VAL (voice-activated light stand) hold my softbox for me. Travel companions make great VALs as they not only allow you to change the position of the light without moving near your subject and having to recompose your shot again, but also save you the hassle of setting up your light stand (or having it blown down by the wind if it's not weighted).
 Of course, you graciously show your VAL gratitude by making a picture of her as well. Thanks, Jing.
Wow! I like this! I don't really understand the technical details yet but your description made me slightly get the picture. Interesting!
ReplyDeleteThanks, Jayce. I'm glad that you found this interesting and that I was actually able to explain the process behind the pictures well enough.
ReplyDelete