What goes on in that big melon of yours before you take the shot? (Maybe not in those exact words, but you get the picture.)
I probably get asked this a lot because I tend to space out and mutter to myself while I make adjustments to my setup. I try to work as quickly as I can, so as not to bore my subject or drive her crazy with the minute modifications to posing and/or lighting that ‘must’ be made. I try to talk to my subject to keep them occupied, but I have yet to master the skill of maintaining a conversation while working on the shot or vice versa. The reason for my general lack of an ability to multi-task is because there’s a lot of ‘inside’ talk going on in my head. If I didn’t keep it in check, I might unintentionally blurt out parts of my internal monologue, such as —
I’m going to put the light more to your right side because it makes your face look … err, slimmer.
For this peek into
If you’d like to know what went on in my bulbous head while I shot the picture above, then click on the link below to read more after the jump.
__________
While the subject is setting her experiment up, I make a quick ‘guess’ about the settings I’ll be working with and take a quick test shot.
- Aperture: f/4 — This allows me to keep my lone subject in focus and keep my flash power at a reasonably low power setting, so I can have them recycle quicker, which will allow me to shoot at a reasonably fast pace.
- Shutter speed: 1/125 s — I should have no problem with camera shake at this shutter speed, and I should be able to eliminate most of the contribution from ambient light.
- ISO: 200 — A reasonable compromise between sensitivity and noise.

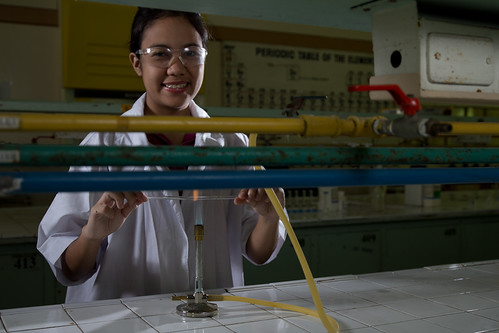
When I intend to light a picture, I always start with ambient fill, which will primarily tell me how my shadows will look like. So, after my test shot (which also fired one of the flashes in a beauty dish on the far end of the room), I found that I could work with the above settings, but didn’t like the fact that light from the overhead fluorescent lamps (hummers) were still bleeding into the picture (it’s evident in the area behind her).

I turn the lights off and bring in two flashes.
- Flash 1 (key) — 1/4 power in a beauty dish on camera left
- Flash 2 (accent) — 1/16 power in a grid on camera right
Okay, to me, it’s a more dramatic shot with the hummers off and the flashes in. But, if I used this image in a brochure, potential enrollees might get the idea that we supply our students with night vision goggles because you’d need a pair to get around a lab that dark. But, being the doofus that I am, I also didn’t see that the glass tube she was heating was completely covered by the pipes in front of me.

In the above picture, I made three changes:
- Used a slower shutter speed of 1/30 s to allow the sunlight streaming into the room to show in the picture. As you can see, it’s of a better quality than what you get from hummers. And as I had my elbow propped on the table, I was able to minimize shake from handholding the camera.
- Framed the picture in such a way that what she was doing was now clearly visible in the shot.
- Brought in a third light as fill (Flash 3 — 1/32 power through a white umbrella) in front of the subject.
But, the subject looked too serious, so I had her look up and smile (which is what you actually see in the first image in this post). It’s not the safest thing to do with glass melting in your hands, but it drives the point home that
And because I almost always shoot RAW, I made use of the advantage of being able to develop the image according to my taste and style. I do process my photos, but I only retouch them (and only for portraits) if the perceived ‘blemish’ takes away from the quality of the final image. The image below is a finished version of the first picture in this post.

I had my shot. I was happy with it, but it never hurts to try something while you still have everything set up. So, I moved to the side and got the shot below.

I got another clear keeper and all it took me were a few steps.
So, the next time we work on a shoot and you see me furrow my brow. I’m not fixating on something on your face, but rather listening to the voice in my head. :-)#
More to come ...
Hmmm..someone is productive today. 2 posts in a day. You haven't done this before. :)Great job, P're, to an informative post, a productive day and the beautiful shots (I am including the unprocessed ones, those that you don't normally consider as keepers). :)
ReplyDeleteThe last shot is indeed a beauty shot. Technically well executed.
ReplyDeleteProductive in this sense, yes. Don't just ask me about work. :-)#
ReplyDeleteThank you for the compliments. Writing has come easier for me lately, so I'm making the most out of it.
Thanks, Hess. I'm quite happy with it as well. I got the look that I wanted, and also made the picture more about the person and less about the light.
ReplyDeleteNaka-relax na jud intawn si Tara sa last shot :)
ReplyDelete